Flip books are a fun way to tell a story without spending tons of money on video production. You can tell a story without words by taking a ream of paper and getting to work today. Here’s what it takes to make your own flip book:
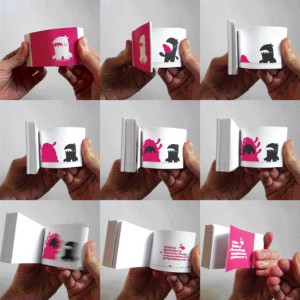 How Flip Books Work
1. Get the stack. Secure a stack of paper, preferably a ream. Assume that you’ll need at least a few dozens sheets, so have plenty of paper on hand to correct your mistakes. Shred your discarded sheets or use the flip side as scratch paper.
2. Create a story. A flip book tells a story, one that is typically told in three to five seconds. That makes for a quick story, but when you see how much paper you’ll need, you’ll want to make it a fast one. Identify your theme, your characters, related objects and other essentials that will be included with your story telling. Keep it simple as you’ll be using the same basic theme on each sheet.
3. Assemble your tools. Paper is nothing unless you have a writing utensil to apply your idea. Keep it simple — a No. 2 pencil can help you make quick work of it. If you want to color something in as a contrast, then consider one or two primary colors. For instance, if your story shows a little girl sitting at a table eating her food, the food might be in color.
4. Stack and draw. Stack several pieces of paper together and begin drawing your outline. You’ll want to draw hard enough for a shadow of the outline to appear on the next sheet. That way, you can draw an exact replica of what you did on the first sheet. Keep your design simple as you’ll be drawing it over and over again.
5. Head to the next sheet. Your second frame will be identical to the first except where you are attempting to show motion. In the example of the girl sitting at the table eating, you could show her fork moving slightly up with each frame and her mouth opening wider.
6. Keep in mind movement. Frames without changes won’t reflect movement. Consider how you will convey motion from frame to frame. Incremental changes flow smoothly while larger changes may appear unnatural.
7. Perform a test run. After you have completed five or six sheets, monitor your progress Keep the sheets together and being to flip through to see how the frames work. If you make a mistake, erase and modify or otherwise pull out a fresh sheet and redo that frame. Once you are satisfied with your work you can resume your production.
8. Fill in the detail. With an outline in place you can see how a flip book works. Now imagine fleshing out the story to show more details to increase visual interest. For instance, the girl sitting at the table might have a cat sitting at her feet or a glass of milk nearby. You can keep these secondary objects static or provide more movement as you see fit. For instance, you might have the milk level automatically drop even without the girl drinking from the glass.
No Limit to Creativity
Make one flip book and you’ll be busy making more. Perhaps a lot more. Flip books can also be made on a computer with a graphics program such as Photoshop or Gimp providing the tools you need.
Once you’re done, you can glue or staple the edges of the flip book and start flipping. You’ll attract much fan interest and may find yourself enjoying a new hobby.
Leave a Reply